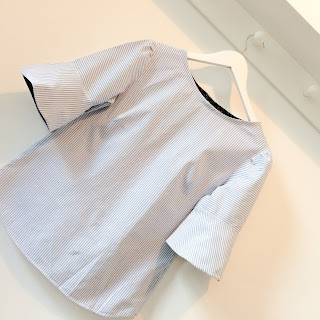
Here are 2 projects transforming shirts into something new!
First up, an on-trend bell sleeve blouse!
His favourites shirt all come from a gorgeous Italian Camiceria in Lucca, Tuscany called Cerri that we go to every year. Its a special place where they have gorgeous handmade shirts. I m very thrilled when one of their shirts heads my way as the fabric they use is stunning.
So this is why I got this one- the cuff had worn out. shame ;)
So first up I cut the sleeves off & cut down the side seams to open it out.
I then use my top block to cut the bodice. I cut the back bodice out of the front of the shirt, so the buttons go centre back. I wanted to keep the original nicely curved hem so i line it up with that.
Here you see it... I left out the darts and just tapered in the side seam a bit, as I didn't want darts interfering with the stripes.
Then I cut the front piece from the back of the shirt. I did put the bust darts in, as I find they make a huge difference to fit. So I sew the shoulders together & check how its looking on my dress form.
I open out the sleeve piece and use a sleeve pattern I have in my collection. I wanted bell sleeves that are so on trend right now and i wanted to make a feature of stripes going in different directions. So I laid out the pattern pieces like this (also it was the only way they would fit!!) Sleeves are from Simplicity pattern 8213
For a bit of added interest I lined the cuff with some contrast Liberty. Its a nice detail that you can see when you move & the added weight gives more body, which I wanted to emphasise the shape.
And I made matching bias binding to finish the neck
And here she is. 2-3 hours tops, including cutting. I left the hem as the original, so no sewing there and I left the buttons original too.
Here is the back view...
And the front...
 |
 Second my shirt skirt!
 He gave this lovely purple striped shirt to me for scrap and I saw new life! The cuffs and collar were worn but the fabric great.
First I cut off the fabric under the arms, straight across front and back. To the front: I added some pleats down the front and sewed down the side of the buttons so it doesn't flap open - I sewed down to the last button, so the bottom bit opens, but not the rest.
To the back: I added some darts
To the side: I added an invisible zip
Then I made a waistband from the sleeve fabric and used the remaining buttons as a fastener. I really like the stripes going round at the waistband as a nice contrast.
So there it is! It cost me nothing and only took a couple of hours. I ve got my eye on some of his other shirts.... when they reach the end of their shirt life, maybe they can be reborn too.
What do you make from shirts? Share your secrets, I m always looking for new ideas.
Messy Essy Makes
x


Ooh your shirt refashion is great! You've inspired me to try that as my husband has just given me one of his striped shirts. :)
ReplyDeleteSuch great refashions!! Love the buttons down the back and those sleeves are fab!! I made an off shoulder top from a shirt but never thought about a skirt, it looks lovely, an idea I need to copy :) my husband doesn't really wear shirts so will try to find a decent second hand one.
ReplyDeleteThese are great! My husband wears out a lot of dress shirts (collars and cuffs) too. Thanks for posting.
ReplyDelete