BLOGLOVIN'

Follow
Showing posts with label handmade wardrobe. Show all posts

Tuesday, 12 September 2017

The Refashioners 2017 #suitsyou


Its Refashioners time again and this year I m part of the blogger line up... eeekkk!  I had a ball last year and am still  amazed I won...  so that set the bar pretty high for what i would come up with this year.


The task this year? Refashion a mens suit.  Luckily my husband has good taste in suits and had a wonderful Burberry number that had a big rip down the leg.  I'd had it in the cupboard for quite some time, so the theme this year was spot on!  I absolutely love the fabric, the details and as I deconstructed, wow I was in awe of whoever made this.  True craftsmanship.
The thing that impressed me the most was the shear number of layers, textures and details in creating the shape and support around the collar and sleeve.  Look at this - the sleeve head had no less than 7 layers of different fabrics.  Needless to say I kept as much of the tailoring intact as I could or reused it.  I kept the shoulder tailoring largely intact.  I couldn't do the same for the sleeve head as it was totally the wrong shape, but I unpicked and re-used several of these layers to add shape to my jacket.

Deconstruction time... as always, it takes way longer than you think when you want to do it well and preserve the pieces intact.  At this stage I hadn't fully decided what pattern to make. I wanted to assess what I had to work with first.  Even though the jacket was huge relative to my size, strangely it was awkward to work with to create a new jacket in a different style...     Messy as always

So lets talk style. My intention was to create a new jacket in a much more relaxed, casual shape.  Here is my inspiration:

I wanted a very simple pattern to use as a very basic structure that I would then free style from.  I chose the Ollie Bomber jacket- I've made it before for my son so I know its super easy and I felt I could hack from that.   I started with the lining.  The lining of the original jacket is something really special with so many lovely details I wanted to keep.  So  I carefully positioned my lining making best use of the original, keeping pockets & all.  I especially love the fact the sleeve lining is stripy!

I made up the lining to check fit.

Fit was pretty ok so I went ahead cutting the rest...  ðŸ˜ž I dug out the trousers which had been in my picnic hamper of scraps for at least 6 months.... the moths had got to them before I did - I held them up to the window so you could see- the whole trousers were covered in  moth holes  AARRRRHGGGHHH.   Wish I'd kept them with the jacket in the wardrobe. So plan B.  I didn't have enough fabric just using the jacket.  So I found a different pair of contrasting trousers, also worn through on one knee.
I used the contrast trousers for sides in the back jacket, the waist, cuffs and neck tie.   I had to do some adjustments around the neck and spent time pinning the waist till I got the  slight 'bomber' shape I was looking for:
Then I simply sewed it all together, fitting along the way.  As you see here (inside of the jacket front), I left alot of  the tailoring in place.
Instead of the usual bomber neck line and zip, I added in a long neck tie, made from the trouser legs and snap fasteners.

Here are some of my favorite details:

I loved the buttons on the original cuff, so I left them, pleated either side for shape and added a cuff band.  I used Prym snaps for the fasteners.  I really love them (they are from Minerva) and  are quite unusual with the pattern on them.  They are a dream to install with the Prym vario pliers.  One other detail is that at the bottom of the necktie I left in the tape that was on the inside turn-up of the leg!  I needed all the length I could get so I used the full leg + hem allowance to create the tie.


The Pockets can actually work two ways.  I think I like the effect above the best, but I can also untuck the flaps and it then looks like this.  Which do you thinks looks better?  I was also tempted to put snaps on the pocket- but resisted.
The neck can be worn either neatly tied in a bow, or can be left open/loosely tied.

Which do you prefer? I can't resist a bow...
So another years Refashioners complete and again I loved it- both years  I have found I learn so much and its so nice to push myself to make something I wouldn't have thought of otherwise.  I'm so excited to see what everyone else has made!!

To stay up to date with the Refashioners 2017, see all the other inspiring refashions  AND find out how you could win an amazing prize (and trust me its AMAZING!)   go to http://www.makery.uk/the-refashioners/

Sunday, 23 July 2017

Memade Orla Kiely Skirt


I picked up 2 different Orla Kiely fabrics at Fabrics Galore, London recently.  I can't resist the bold prints of Orla Kiely and I'd never come across their fabrics for sale before, so I snapped them up!  They are truthfully furnishing fabric I think, relatively heavy weight. But I couldn't resist making a skirt out of the first one.  I pre-washed it to check it washed ok and it did - it frayed massively (note to self, should have overlocked the edge before washing) but it was fine, phew!  Let the plans commence.


I recently made up this Butterick pattern in denim and have worn it non stop, so it was the obvious choice. This is my first sewing after 3 weeks holiday, so i was dying to get back behind the machine with a relatively quick, indulgent and fun project.


So it was a straightforward make. I worked hard to pattern match behind the pockets and I did my best on the pleat from to have a complete pattern repeat either side, which works quite well.  I was unsure with the waist band whether to do the pattern across or down - but doing down, it would never perfectly match the skirt due to the pleat, so I went for across.


 I wanted a different style of pockets so it wasn't too intrusive with the pattern so I free-styled that and chose to put some piping at the top of the pockets as a feature:


The only other deviation from the pattern that I also did with my previous version was to add some shape to the waistband.  The pattern piece is a perfect rectangle- which personally I don't think works - I m not sure anyone would have a perfectly rectangular waist when the band is so thick.  So my technique here is to sew the front waistband to the front skirt  and shape off the waistband following the line of the skirt (so effectively cutting a triangle off each corner).  I repeat for the back, then sew the front & back together in one go.


The final details I wanted to share are on the inside.  I had a dust bag for an Orla Kiely handbag so I cut that up and used it as the facing fabric for the waistband as well as the inside of the pockets.  No one else sees it but it makes me happy to have the iconic stem print on the inside too.


I did alot of topstitching - I was undecided but the fabric felt like it needed it for stability, especially down the side seams and around the front pleat, so I also did some top stitching on the waist band too.  Probably not everyones cup of tea, but I m quite happy with it- gives it a more informal vibe and I m hoping strengthens the seams too.

And finally,  I used bias binding on the hem.  The fabric frays heavily so needed properly finishing and was too thick to double turn up- so this seemed like the best solution.


I m so happy with this skirt.  I love the pattern and the colours and the style of this really fits me perfectly.  I love skirts that fit snugly on the hip, have a bit of body and also have pockets and this ticks all three boxes.


Messyessymakes
x


Thursday, 6 April 2017

upcycling shirts!

My husband wears shirts on a daily basis and does have a tendency to buy very expensive ones.  Every so often a find a pile of them in the category of 'do you want these shirts for scrap fabric or should I take them to the charity shop'.  Well  I've discovered that lots of things can be made from an old shirt!  When they come my way they are usually just a bit worn around the cuff/collar or the fabric has a rip/pluck somewhere- but usually the rest of the fabric is just perfect!!

Here are 2 projects transforming shirts into something new!


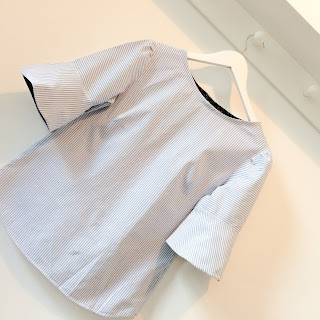
First up, an on-trend bell sleeve blouse!

His favourites shirt all come from a gorgeous Italian Camiceria in Lucca, Tuscany called Cerri that we go to every year.  Its a special place where they  have gorgeous handmade shirts.  I m very thrilled when one of their shirts heads my way as the fabric they use is stunning.

So this is why I got this one- the cuff had worn out. shame ;)


So first up I cut the sleeves off & cut down the side seams to open it out.

I then use my top block to cut the bodice.  I cut the back bodice out of the front of the shirt, so the buttons go centre back.  I wanted to keep the original nicely curved hem so i line it up with that.

Here you see it...  I left out the darts and just tapered in the side seam a bit, as I didn't want darts interfering with the stripes.

Then I cut the front piece from the back of the shirt. I did put the bust darts in, as I find they make a huge difference to fit.  So I sew the shoulders together & check how its looking on my dress form.

 I open out the sleeve piece and use a sleeve pattern I have in my collection.  I wanted bell sleeves that are so on trend right now and i wanted to make a feature of stripes going in different directions.  So I laid out the pattern pieces like this (also it was the only way they would fit!!)  Sleeves are from Simplicity pattern 8213

For a bit of added interest I lined the cuff with some contrast Liberty.  Its a nice detail that you can see when you move & the added weight gives more body, which I wanted to emphasise the shape.
 And I made matching bias binding to finish the neck
 And here she is.  2-3 hours tops, including cutting.  I left the hem as the original, so no sewing there and I left the buttons original too.

Here is the back view...
refashioned shirt

And the front...
shirt upcycle


refashion sewingSecond my shirt skirt! 

He gave this lovely purple striped shirt to me for scrap and I saw new life! The cuffs and collar were worn but the fabric great.


First I cut off the fabric under the arms, straight across front and back.  To the front: I added some pleats down the front and sewed down the side of the buttons so it doesn't flap open - I sewed down to the last button, so the bottom bit opens, but not the rest.
upcycled fashion


To the back: I added some darts


To the side: I added an invisible zip
Then I made a waistband from the sleeve fabric and used the remaining buttons as a fastener.  I really like the stripes going round at the waistband as a nice contrast.


So there it is!  It cost me nothing and only took a couple of hours.  I ve got my eye on some of his other shirts.... when they reach the end of their shirt life, maybe they can be reborn too.

What do you make from shirts?  Share your secrets, I m always looking for new ideas.
Messy Essy Makes
x


Sunday, 19 March 2017

Scuba- friend or foe?!

I' ve never sewed scuba before and I had some reservations- I tend to prefer natural fibres- wool or cotton are my staples- and I do find scuba feels rather synthetic. But you can't deny it gives a great shape and there is so much of it out there, so I thought I would give it a go.

I was sold by this double sided fabric which is a stunning vibrant blue one side and dark grey the other. I m using a new pattern and consider this a tester version so if it doesn't work out, I m not too stressed. 


Here is the finished dress:


So, what's my verdict on scuba?

Positives:
-easy to sew
- dream to cut
- no heming required!!
- shape & fit. Wow this really looks amazing on.  I haven't made many things that look as good as this in terms of fit. With the right patten it's clear it can give you an amazing shape and skim any lumps & bumps that some fabrics accentuate!
- colour. The colour of the scuba is just a dream, totally vibrant and jewel like

Negatives:
- I found it nigh on impossible to unpick. I sewed the zip in the wrong way (doh!!!) and just couldn't unpick without causing a hole in the fabric. Luckily there was enough stretch and ease that I just took 1cm off the back seam and started again
- uncomfortable to wear. I don't like the feeling of the fabric and I find the overlocked seams uncomfortable- they are bulky, stick out and are a bit scratchy on the inside
-impossible to iron. I found it tricky to get seams and darts to lie nicely as if I got iron too hot the fabric melted and stuck 😬
- it's got volume. Good for shape but I struggled with the facing and top of the zipper - it won't lie flat, sticking up etc- not helped by its aversion to the iron.  I ended up sewing it down which helped. Maybe the facing should have been a different fabric or technique altogether? How do you finish a scuba neck line?
- I'm convinced it won't wear well, I m expecting it to bobble. But that's a hunch, no evidence so far - and well I ll probably not find out since I don't think it will be worn.

My verdict. It looks amazing, but I don't like it. To the extent I m not sure I will ever wear it. I made it several weeks ago and haven't been tempted. Normally I'm a wear it the next day girl!  Think this may be my first and last scuba project. But glad I gave it a go. 

What's your views on scuba? Any tips? Did I make some obvious errors?!

Keen to hear your thoughts 
Messy Essy makes x


Ps. Love the pattern. And this served to let me perfect the fit- so my next one in Liberty twill is a big success and I've worn this one several times already ;)