BLOGLOVIN'

Follow
Showing posts with label therefashioners2016. Show all posts

Tuesday, 12 September 2017

The Refashioners 2017 #suitsyou


Its Refashioners time again and this year I m part of the blogger line up... eeekkk!  I had a ball last year and am still  amazed I won...  so that set the bar pretty high for what i would come up with this year.


The task this year? Refashion a mens suit.  Luckily my husband has good taste in suits and had a wonderful Burberry number that had a big rip down the leg.  I'd had it in the cupboard for quite some time, so the theme this year was spot on!  I absolutely love the fabric, the details and as I deconstructed, wow I was in awe of whoever made this.  True craftsmanship.
The thing that impressed me the most was the shear number of layers, textures and details in creating the shape and support around the collar and sleeve.  Look at this - the sleeve head had no less than 7 layers of different fabrics.  Needless to say I kept as much of the tailoring intact as I could or reused it.  I kept the shoulder tailoring largely intact.  I couldn't do the same for the sleeve head as it was totally the wrong shape, but I unpicked and re-used several of these layers to add shape to my jacket.

Deconstruction time... as always, it takes way longer than you think when you want to do it well and preserve the pieces intact.  At this stage I hadn't fully decided what pattern to make. I wanted to assess what I had to work with first.  Even though the jacket was huge relative to my size, strangely it was awkward to work with to create a new jacket in a different style...     Messy as always

So lets talk style. My intention was to create a new jacket in a much more relaxed, casual shape.  Here is my inspiration:

I wanted a very simple pattern to use as a very basic structure that I would then free style from.  I chose the Ollie Bomber jacket- I've made it before for my son so I know its super easy and I felt I could hack from that.   I started with the lining.  The lining of the original jacket is something really special with so many lovely details I wanted to keep.  So  I carefully positioned my lining making best use of the original, keeping pockets & all.  I especially love the fact the sleeve lining is stripy!

I made up the lining to check fit.

Fit was pretty ok so I went ahead cutting the rest...  ðŸ˜ž I dug out the trousers which had been in my picnic hamper of scraps for at least 6 months.... the moths had got to them before I did - I held them up to the window so you could see- the whole trousers were covered in  moth holes  AARRRRHGGGHHH.   Wish I'd kept them with the jacket in the wardrobe. So plan B.  I didn't have enough fabric just using the jacket.  So I found a different pair of contrasting trousers, also worn through on one knee.
I used the contrast trousers for sides in the back jacket, the waist, cuffs and neck tie.   I had to do some adjustments around the neck and spent time pinning the waist till I got the  slight 'bomber' shape I was looking for:
Then I simply sewed it all together, fitting along the way.  As you see here (inside of the jacket front), I left alot of  the tailoring in place.
Instead of the usual bomber neck line and zip, I added in a long neck tie, made from the trouser legs and snap fasteners.

Here are some of my favorite details:

I loved the buttons on the original cuff, so I left them, pleated either side for shape and added a cuff band.  I used Prym snaps for the fasteners.  I really love them (they are from Minerva) and  are quite unusual with the pattern on them.  They are a dream to install with the Prym vario pliers.  One other detail is that at the bottom of the necktie I left in the tape that was on the inside turn-up of the leg!  I needed all the length I could get so I used the full leg + hem allowance to create the tie.


The Pockets can actually work two ways.  I think I like the effect above the best, but I can also untuck the flaps and it then looks like this.  Which do you thinks looks better?  I was also tempted to put snaps on the pocket- but resisted.
The neck can be worn either neatly tied in a bow, or can be left open/loosely tied.

Which do you prefer? I can't resist a bow...
So another years Refashioners complete and again I loved it- both years  I have found I learn so much and its so nice to push myself to make something I wouldn't have thought of otherwise.  I'm so excited to see what everyone else has made!!

To stay up to date with the Refashioners 2017, see all the other inspiring refashions  AND find out how you could win an amazing prize (and trust me its AMAZING!)   go to http://www.makery.uk/the-refashioners/

Thursday, 6 April 2017

upcycling shirts!

My husband wears shirts on a daily basis and does have a tendency to buy very expensive ones.  Every so often a find a pile of them in the category of 'do you want these shirts for scrap fabric or should I take them to the charity shop'.  Well  I've discovered that lots of things can be made from an old shirt!  When they come my way they are usually just a bit worn around the cuff/collar or the fabric has a rip/pluck somewhere- but usually the rest of the fabric is just perfect!!

Here are 2 projects transforming shirts into something new!


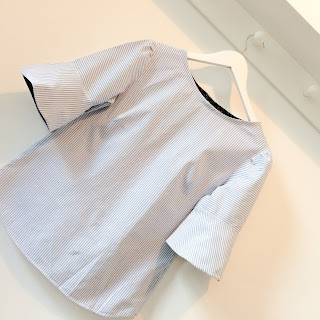
First up, an on-trend bell sleeve blouse!

His favourites shirt all come from a gorgeous Italian Camiceria in Lucca, Tuscany called Cerri that we go to every year.  Its a special place where they  have gorgeous handmade shirts.  I m very thrilled when one of their shirts heads my way as the fabric they use is stunning.

So this is why I got this one- the cuff had worn out. shame ;)


So first up I cut the sleeves off & cut down the side seams to open it out.

I then use my top block to cut the bodice.  I cut the back bodice out of the front of the shirt, so the buttons go centre back.  I wanted to keep the original nicely curved hem so i line it up with that.

Here you see it...  I left out the darts and just tapered in the side seam a bit, as I didn't want darts interfering with the stripes.

Then I cut the front piece from the back of the shirt. I did put the bust darts in, as I find they make a huge difference to fit.  So I sew the shoulders together & check how its looking on my dress form.

 I open out the sleeve piece and use a sleeve pattern I have in my collection.  I wanted bell sleeves that are so on trend right now and i wanted to make a feature of stripes going in different directions.  So I laid out the pattern pieces like this (also it was the only way they would fit!!)  Sleeves are from Simplicity pattern 8213

For a bit of added interest I lined the cuff with some contrast Liberty.  Its a nice detail that you can see when you move & the added weight gives more body, which I wanted to emphasise the shape.
 And I made matching bias binding to finish the neck
 And here she is.  2-3 hours tops, including cutting.  I left the hem as the original, so no sewing there and I left the buttons original too.

Here is the back view...
refashioned shirt

And the front...
shirt upcycle


refashion sewingSecond my shirt skirt! 

He gave this lovely purple striped shirt to me for scrap and I saw new life! The cuffs and collar were worn but the fabric great.


First I cut off the fabric under the arms, straight across front and back.  To the front: I added some pleats down the front and sewed down the side of the buttons so it doesn't flap open - I sewed down to the last button, so the bottom bit opens, but not the rest.
upcycled fashion


To the back: I added some darts


To the side: I added an invisible zip
Then I made a waistband from the sleeve fabric and used the remaining buttons as a fastener.  I really like the stripes going round at the waistband as a nice contrast.


So there it is!  It cost me nothing and only took a couple of hours.  I ve got my eye on some of his other shirts.... when they reach the end of their shirt life, maybe they can be reborn too.

What do you make from shirts?  Share your secrets, I m always looking for new ideas.
Messy Essy Makes
x


Saturday, 17 September 2016

My #refashioners2016 kids choo choo jacket


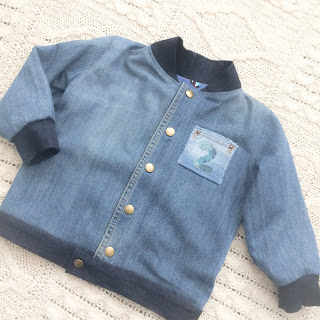
After my first refashioners project I had lots of denim left over and a thirst for more! It was my little ones 2nd birthday coming up so I decided to make him something special. He had started to get very particular about clothes and very stubborn too (no idea where he gets that from ;) ) only wanting to wear certain colours and clothes with his favourite vehicles or animals on. Coats are always a battle as his are all dull. So mummy decided it was time for his first denim jacket, with a twist. 

His absolute favourite thing in the world right now are trains. We have been known to go on a day trip into London and never even leave  Waterloo, he gets that excited. And when I was working with denim I started seeing engines (or do I now see Thomas in everything that I m so indoctrinated!!).   I decided on a bomber jacket style and bought the Ollie pattern from Sew A Little Seam.  I cut out the pieces basically working around which big, intact and solid pieces I had left. I decided on a few modifications. First jeans buttons, not a zipper.  I would also use stretch denim for the collar, cuffs and waist not the usual ribbed Jersey so I needed to cut those pieces bigger as I had way less stretch than the patten intended. The big job was crafting my masterpiece on the back!!!


I firstly drew the train I wanted on paper and cut them out for templates.  I then sorted through the fabric bits to choose what to use where.  I already had plans for some pieces.    I had a darker jean with a nice double stitched inside leg seam with 2 colours which were perfect train tracks!!


I had  a pocket with ridges down it which was perfect for the body of the train.  I also had plans for some belt loops for the chimneys on the train.  And finally, I had some pocket insides which have a cool gradient on them, which I thought would be perfect carriages!!  When I started putting it together I realised it needed a pop of colour & decided on buttons for wheels. 

I played around with placement and changed my mind on the colour of the carriage a few times.  When I was happy, I  went about attaching pieces.  I did this in different ways.   Some pieces I stuck the pieces in place with wonder web to hold them in the desired spot before top stitching.  Some bits I just oversewed the edge with a zig zag stitch, others I turned the edges under & top stitched.

For my smoke puffs I wanted a frayed edge so I frayed around them, then sewed inside of this a little.


Once the back choo choo was done, it was a simple construction job.  The instructions are great, I just simply followed them.  The cuffs are a bit fidly as they are so small  ( and I was using stretch denim rather than ribbing).

On the front of the jacket, I put a leg seam down the front for a bit of a feature then used Prym pliers & jean poppers down the front.  It required a bit of scary hammer work to get the holes in, but putting the poppers in was a breeze with the pliers - I highly recommend them and I love how they look.

I wanted a detail on the front and I found a little pocket on one of the jeans I really adored, so I cut around it and simply sewed it on with a tight zig zag round the edge.  It will fray, but I kind of like that look.  I found some great cheek fabric in the pockets of one pair of jeans- turquoise in one pocket & red in the other!  I used the turquoise to create a '2' on the front pocket (given it was for his second birthday, it felt apt!).

I then decided I could incorporate the checked fabric on the back too- as little triangles in the carriages.

The only parts of the jacket that isn't from the original jeans is the buttons, popper & lining.  I wanted it to be cosy for him and wanted a bit more colour so I picked a cute jersey fabric to line it with:

And there we have it, this is the finished jacket!  


And of course a cute picture or two of him wearing it...

So thats it- my second refashioners project- another one I m really happy with.  I could get really hooked on this denim thing....

Thanks for reading....
Messy Essy Makes
x