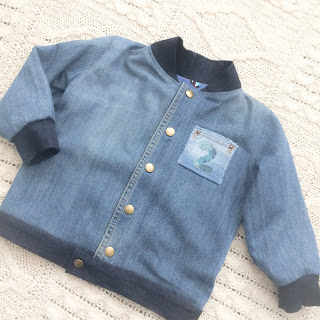
After my first refashioners project I had lots of denim left over and a thirst for more! It was my little ones 2nd birthday coming up so I decided to make him something special. He had started to get very particular about clothes and very stubborn too (no idea where he gets that from ;) ) only wanting to wear certain colours and clothes with his favourite vehicles or animals on. Coats are always a battle as his are all dull. So mummy decided it was time for his first denim jacket, with a twist.
His absolute favourite thing in the world right now are trains. We have been known to go on a day trip into London and never even leave Waterloo, he gets that excited. And when I was working with denim I started seeing engines (or do I now see Thomas in everything that I m so indoctrinated!!). I decided on a bomber jacket style and bought the Ollie pattern from Sew A Little Seam. I cut out the pieces basically working around which big, intact and solid pieces I had left. I decided on a few modifications. First jeans buttons, not a zipper. I would also use stretch denim for the collar, cuffs and waist not the usual ribbed Jersey so I needed to cut those pieces bigger as I had way less stretch than the patten intended. The big job was crafting my masterpiece on the back!!!
I firstly drew the train I wanted on paper and cut them out for templates. I then sorted through the fabric bits to choose what to use where. I already had plans for some pieces. I had a darker jean with a nice double stitched inside leg seam with 2 colours which were perfect train tracks!!
I had a pocket with ridges down it which was perfect for the body of the train. I also had plans for some belt loops for the chimneys on the train. And finally, I had some pocket insides which have a cool gradient on them, which I thought would be perfect carriages!! When I started putting it together I realised it needed a pop of colour & decided on buttons for wheels.
I played around with placement and changed my mind on the colour of the carriage a few times. When I was happy, I went about attaching pieces. I did this in different ways. Some pieces I stuck the pieces in place with wonder web to hold them in the desired spot before top stitching. Some bits I just oversewed the edge with a zig zag stitch, others I turned the edges under & top stitched.
For my smoke puffs I wanted a frayed edge so I frayed around them, then sewed inside of this a little.
Once the back choo choo was done, it was a simple construction job. The instructions are great, I just simply followed them. The cuffs are a bit fidly as they are so small ( and I was using stretch denim rather than ribbing).
On the front of the jacket, I put a leg seam down the front for a bit of a feature then used Prym pliers & jean poppers down the front. It required a bit of scary hammer work to get the holes in, but putting the poppers in was a breeze with the pliers - I highly recommend them and I love how they look.
I wanted a detail on the front and I found a little pocket on one of the jeans I really adored, so I cut around it and simply sewed it on with a tight zig zag round the edge. It will fray, but I kind of like that look. I found some great cheek fabric in the pockets of one pair of jeans- turquoise in one pocket & red in the other! I used the turquoise to create a '2' on the front pocket (given it was for his second birthday, it felt apt!).
I then decided I could incorporate the checked fabric on the back too- as little triangles in the carriages.
The only parts of the jacket that isn't from the original jeans is the buttons, popper & lining. I wanted it to be cosy for him and wanted a bit more colour so I picked a cute jersey fabric to line it with:
And there we have it, this is the finished jacket!
And of course a cute picture or two of him wearing it...
So thats it- my second refashioners project- another one I m really happy with. I could get really hooked on this denim thing....
Thanks for reading....
Messy Essy Makes
x


